Python Plugin 101
The core idea of TuneFlow's plugin system is that you only care about the data model, NOT the implementation.
Lifecycle of a Plugin
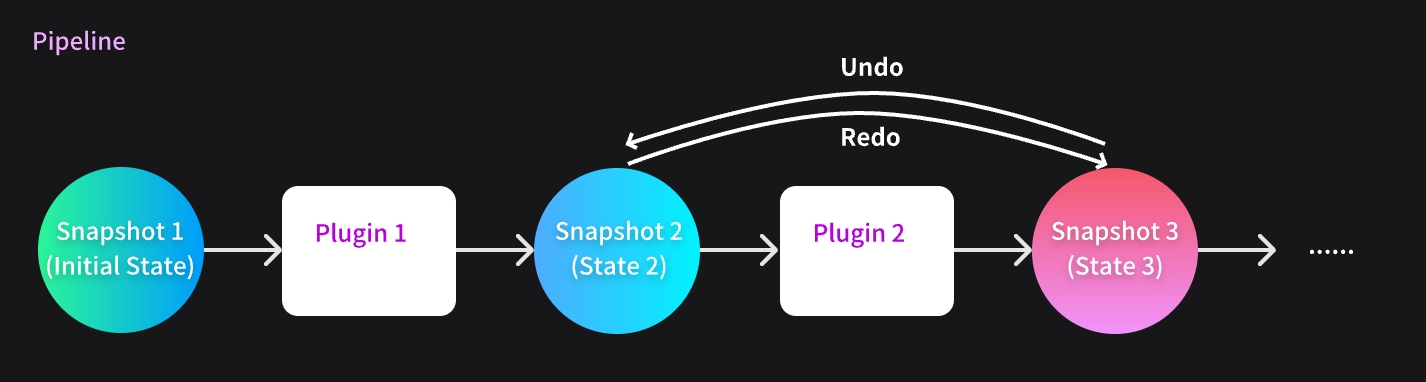
A plugin's only goal is to modify the song, and the DAW will get the modified result and apply changes automatically. Below is an illustration:
The lifecycle of a plugin consists of 5 stages: installed, created, cunning, finished and error.
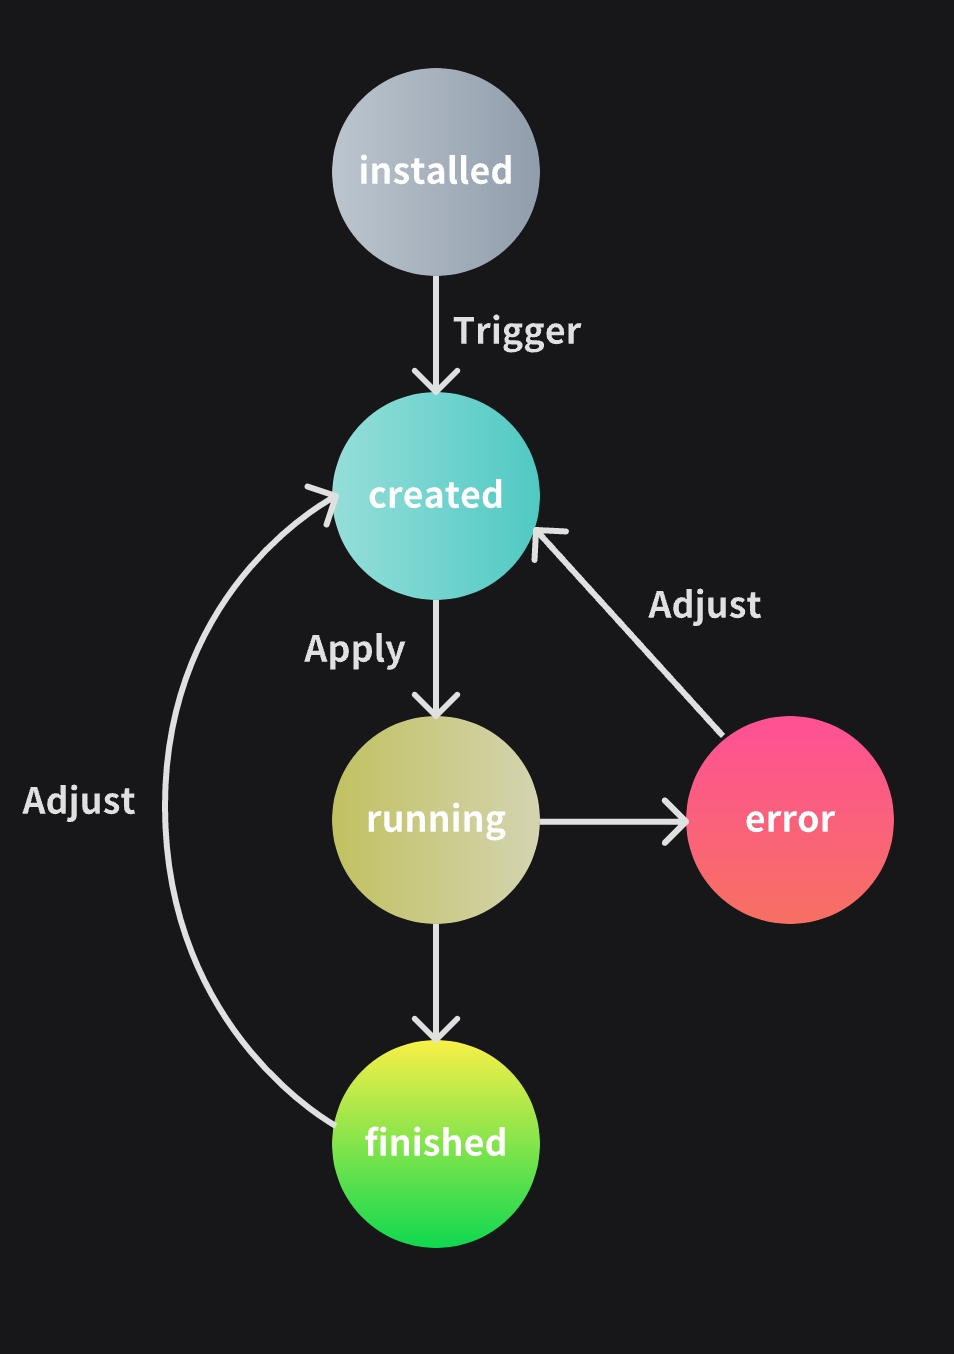
installedThis is when the plugin has been installed to the plugin inventory but hasn't been triggered by the user.createdThis is when the user triggers the plugin from the plugin inventory or a right-click menu. At this point, the plugin is added to the editing panel, but the params that are needed from the user or the DAW are not fulfilled yet.runningThis is when the user hits the Apply button of the plugin control panel(or if all params have been fulfilled at creation and no Apply button is specified for this plugin) and starts running the plugin.finishedThis is after the plugin has modified the song snapshot and the DAW has created a new snapshot based on the modified result. The plugin is then destroyed and resources are freed.errorThis happens if the plugin encountered error during therunningstage.
Stage Transitions
The basic stage transition follows the installed -> created -> running -> finished order. But there are two exceptions:
If the plugin encountered error during the
runningstage, the status bar turns red and it transitions into theerrorstage.If the user choose to adjust a plugin at
finishedorerrorstage, it will go back to thecreatedstage.
Defining a Plugin
A python plugin bundle consists of 2 components: The bundle file and the plugin files.
Bundle file (bundle.json)
The bundle file, which we usually name it bundle.json, contains the information of the plugins in this bundle. The information here will be shown to the users before they need to load the code of your plugin.
An example manifest file looks like this.
{
  "plugins": [
    ......,
    {
      "providerId": "my-provider-id",
      "providerDisplayName": "My Provider Name",
      "pluginId": "my-plugin-id",
      "pluginDisplayName": "My Plugin Name",
      "version": "1.0.0",
      "minRequiredDesktopVersion": "1.8.3",
      "options": {
        "allowReset": false
      }
    },
    ......
  ]
}
Notice that for all non-internal plugins, we need to specify triggers and categories.
triggers
It specifies which right-click menus can the plugin be triggered from. For example, context-track-content means that you can trigger it from the right-click menu of the track that you right-clicked on. You can specify multiple triggers, but only one of them will be triggered. For triggers values, see TuneflowPluginTrigger
When the plugin runs, its params will get an additional trigger parameter. It will include the entitie(s) that is actually triggering the plugin, so that the plugin knows which elements to process.
categories
It specifies the categories that the plugin belongs to, so that users can find your plugin easier. For category values, see TuneflowPluginCategory
Plugin code (plugin.py)
Under the plugin's root folder we need to create a plugin.py file, which is where we define the plugin code. You can put other source code under the same folder, too. When TuneFlow runs the plugin, it adds the plugin's root folder to the PYTHONPATH.
A barebone python plugin may look like this:
from tuneflow_py import TuneflowPlugin, Song, ParamDescriptor


class HelloWorld(TuneflowPlugin):
    @staticmethod
    def provider_id():
        return "andantei"

    @staticmethod
    def plugin_id():
        return "hello-world"

    @staticmethod
    def params(song: Song) -> dict[str, ParamDescriptor]:
        return {}

    @staticmethod
    def run(song: Song, params: dict[str, Any]):
        print("Hello World!")
Tips
All methods here are static methods. This is by design: The entire plugin should be stateless -- the outcome of one plugin execution is only determined by the input and NOT by any internal states of the plugin itself.
When writing a plugin, our main focus is in params and run.
params
This is called when the user triggers the plugin (i.e. installed -> created). And you should specify the input parameters that you want from the user or from the DAW. It will be processed by the DAW and generate your plugin's UI widgets.
You can optionally use song to get some additional information about the project's current snapshot, so that you can customize your params. For example, if you have a list of presets that applies to different time signatures, you can use song to read the current song's time signature and filter out those options that don't work for the song when you return params.
run
Called by the DAW when the user actually runs the plugin by hitting the Apply button. (i.e. created -> running)
Here is where you implement your main logic. The method takes in the current song snapshot (song: Song), the params that are actually provided by the user or the DAW (params).
Next
Now we understood the basic lifecycle and structure of a plugin, let's actually start building one! Continue to read Python Plugin Development Guide